Showing posts with label 6. BI Administering. Show all posts

Saturday, May 2, 2015

How to migrate reports into different directory with different package name

Migration of report doesn’t simply replicate folder structure from one version (e.g.10.1.1) to another version (10.2.1). The best way to handle this situation is to change folder structure in 10.1.1 to mirror new folder structure in 10.2.1, and make sure that all reports work, and then move all reports from 10.1.1 to 10.2.1, publish new packages in 10.2.1. If you have problem with production, then you can back deploy it to development server.


There are a few cases where we may encounter:
Case 1: Change data source, while query subject structure remains same.
Case 2: Move reports and packages to different folders
Case 3: Change package name


Case 1: Change data source, while query subject structure remains same


The idea is to change data source connection and keep query subject same as before. The advantage is that all related reports are not requested to change.


Normally, create new data source in new version 10.2.1. Then change 'Content Manager Data Source', and optional ‘Schema’.  The scheme change can be very useful to group all access user groups for that scheme, and make security much easier to manage.  One of problem in framework manager is to have multiple data sources pointing to same data source. The solution is to use XML edit to replace all data source names to a unique one and then delete duplicated source names


Case 2: Move reports and packages to different folders
Reports can be deployed to any folder, with simply copy and paste. However, the associated package path is saved in report specification. There are a few steps to move package from old folder to new folder:
  1. Export reports only in deployment folder;
  2. Import all reports in deployment folder;
  3. Copy reports in right folder as specified;
  4. Deploy new package into old folder, which can be found from old version. report should work at this stage;
  5. Once confirmed that report has no problem, and then CUT package from old folder and PASTE to new folder. The package path reference on report specification will be changed accordingly.


Case 3: Change package name
  1. Once confirmed that report has no problem to run, and then simply change package name in portal. In this case, the package name reference on report specification will be changed accordingly.
  2. Change package name from framework manager, and republish it to override existing package.

Saturday, May 3, 2014

How to embed a Cognos report in an email message body

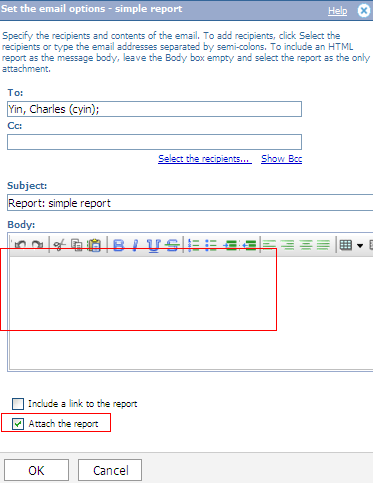
It is very useful to have report in an email body, as the email can be well formatted, and users do not need to open attachment at all. It is even more appropriate for a small report. However, it is a little trick to have this function; the key is that
  • the email body needs to be blank, and
  • the attached report is HTML output.
Please see sample with simple report and event studio


Simple report

Build a simple report
Run report to send email, you can use different ways to schedule a report, such as create a job


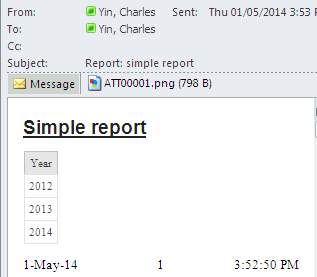
You’ll get report embedded in email body
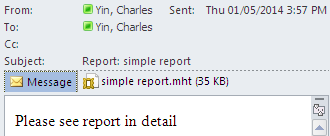
However, if you put anything body, you won’t report embedded with email body anymore.


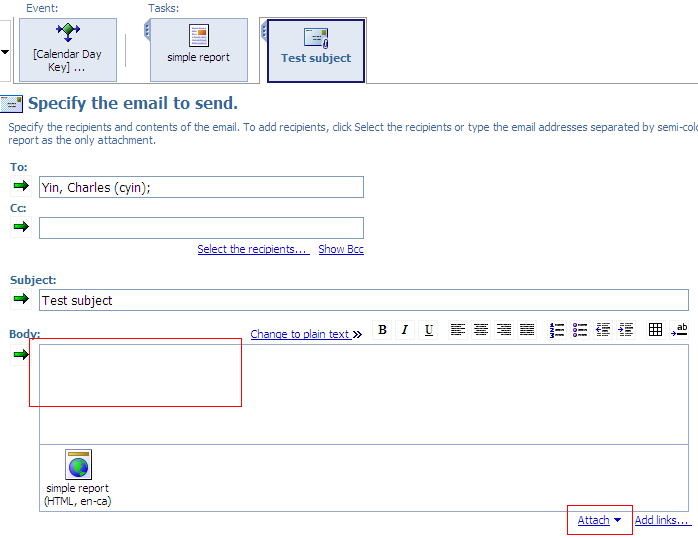
Event studio

It will have the similar behavior as simple report. Event studio does have another way to show message, you can put data into email body with limited format.  

Saturday, February 22, 2014

How to setup the default email sender in Cognos server

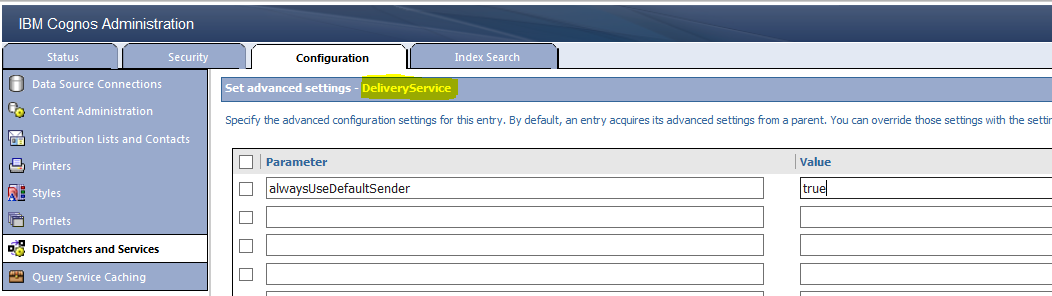
Step 1: Within Cognos Administration go to the configuration tab.
Step 2: Navigate to the Dispatchers and Services tab on the left.
Step 3: Click on a dispatcher to open up the services list, if there is more than one dispatcher, then we need to perform step 4 – step 8 for each dispatcher.
Step 4: For the Delivery service click the Set properties icon.
Step 5: Click the Settings tab.
Step 6: Click Edit on the advanced settings.
Step 7: Add an advanced setting named alwaysUseDefaultSender and set the value to true.


Step 8: Click save button
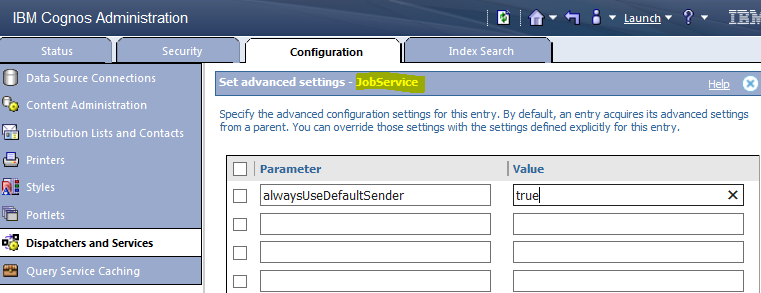
Step 9: repeat step 4 – step 8 for Job service
Part 2:
(UAT: remote into Cognos server. All servers are needed to be configured)
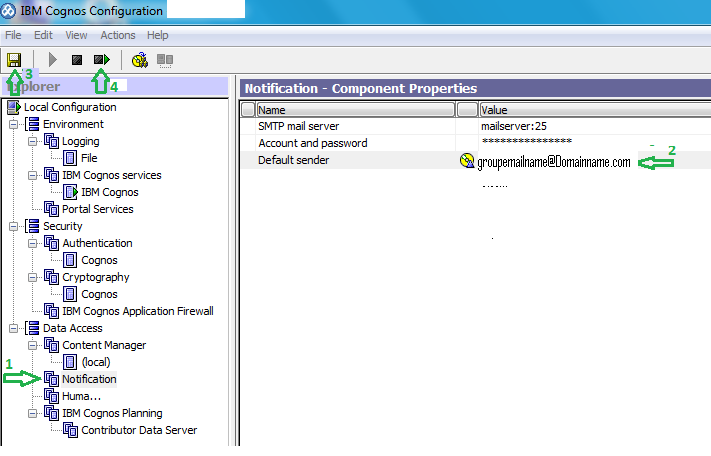
Step 1: Open Cognos configuration: find execute file (C:\Program Files\ibm\cognos10\c10_64\bin64\cogconfigw.exe) and run it as Administrator
Step 2: Go to Notification (see #1 in diagram below)
Step 3: Define default sender as groupemailname@Domainname.com (see #2 in diagram below)
Step 4: Click save button to save setting (see #3 in diagram below)
Step 5: Click restart button to restart the Cognos service (see #4 in diagram below). Setting will be only effective after this step


Saturday, November 16, 2013

How to resolve to the Cognos Go! Office connection issue


When you experience Go! Office error when importing a report with prompts.


The problem has been identified as Cognos gateway server setting issue. The solution is to change “Error pages settings” in Cognos Gateway servers. This is a known bug of IBM Cognos.  The impact of this change is very low on server.


Correction steps for both production and DR:


Step 1 Logon to Cognos Gateway server


Step 2 Launch IIS 7 Application Server Manager (note: must “Run as administrator”)


Step 3 Go to the default “Home” page


Step 4 Double click on the “Error Pages” icon


Step 5 Error page feature screen is display


Step 6 Highlight the Status code “500”


Step 7 Select “Edit Feature Settings” in the Actions pane (at the right hand corner)


it should looks like follows


Step 9 Change the current bullet settings to “Detailed errors”


Step 10 Click on the default home page and click on “Restart” IIS at the right pane of the Action panel

Thursday, April 11, 2013

How to handle “dynamic fact table” using #prompt in framework manger

Context
Based on Kimball methodology, there are three different kinds of fact tables: transactional, periodic snapshot and accumulating snapshot. The case in this document is a very special case, as records in transactional fact table can be used based on user selection. Such fact table is related with trade life cycle.   For the sake of explanation, assume that there is a trade which can be amended multiple times. It is requested to use the last amended trade for calculation of amendment count. There is no way that you can use cube or simple metric to handle it, as all calculation are dependent on selected time frame from user.

Sample

Given trade fact table for month August
Dimension columnsamended datecount
Trade xyzAugust 1, 20121
Trade xyzAugust 5, 20121
Trade xyzAugust 31, 20121
Trade xyzSeptember 5, 2012**1

** last amended

If user choose until August 31  time frame, the amendment count = 1 for Trade xyz;  

Dimension columnsamended datecount
Trade xyzAugust 1, 20121
Trade xyzAugust 5, 20121
Trade xyzAugust 31, 20121
Trade xyzSeptember 5, 20121


if user choose until September  30, the amendment count  still = 1 for Trade xyz;  

Dimension columnsamended datecount
Trade xyzAugust 1, 20121
Trade xyzAugust 5, 20121
Trade xyzAugust 31, 20121
Trade xyzSeptember 5, 20121

This basic logic drive all related performance metrcis 


Solution

The solution is to left fact as it is, however, measure, such as amendment count will be defined in framework manager as

select *
 from (select row_number() over(partition by F.TRADE_ KEY order by F. AMENDMENT_DATE_KEY  desc) LAST_AMENDED_TRADE,
              1 as Amended_Trade_Count,
               Dimension keys
        from FactTable  F
        inner join D_DATE dt on F.AMENDMENT_DATE_KEY = dt.DATE_KEY
        where F. COUNT = 1
        and dt.WORKDAY_INDICATOR = 1
        and to_char(dt."DATE",'yyyy-mm-dd') <= #prompt('fmParam_EndDate, 'date')#
        and to_char(_add_months(dt."DATE",14),'yyyy-mm-dd') > #prompt('fmParam_EndDate’, 'date')#
    ) F1
where F1.LAST_AMENDED_TRADE = 1

(note: DB2 based SQL code)

Based on this definition, amended count will be calculated from end date selected by report user

Sunday, March 31, 2013

How to implement a robust and flexible Cognos security

As a generic guideline of Cognos security implementation is too general to follow, it is proposed to have 4 steps concepts to implement the most popular security architecture.


These 4 steps are:

  1. Use enterprise active directory for user authentication via SSO
  2. Use Local active directory namespace for user authorization
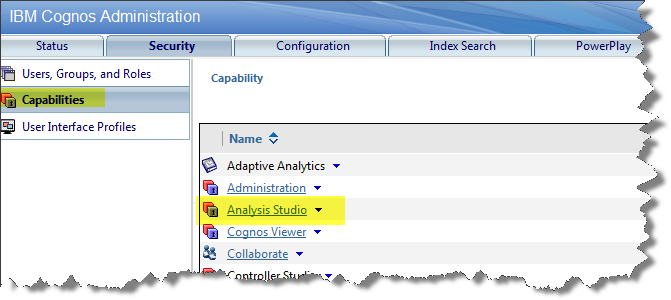
  3. Use Cognos namespace to assign permissions to corresponding capabilities, such as report studio, metrics studio
  4. Use Cognos namespace to assign permissions to individual object, such as folders, packages and reports


Use enterprise active directory for user authentication via SSO


Most of Cognos implementation needs a single sign-on for business user. It can be configured in Cognos configuration as below


If a user is setup in Local AD for Cognos, then user don’t need to login again in Cognos. However, if this user is not setup in Local AD for Cognos, then user will be asked for user name and password (given the fact that Anonymous is disabled).   

In case when you want to test user permission in term of portal page access, or row-level security, then we can create a synonymous user that has the same security setup in Local AD:
  1. User from enterprise AD
  2. Synonymous user mirrored to user from enterprise AD
  3. Then we can login as Synonymous user to test the Cognos functions for  User from enterprise AD


Use Local active directory namespace for user authorization

AD is most used, where all Cognos users and different groups are defined.  

The whole idea is to define all groups, and then these groups will be assigned to Cognos name space. It is the best practices to not assign individual users to Cognos namespace, in order to make security easy to maintain.

More important, we don’t assign any user and groups from local AD to Cognos capacities and objects. There are two reasons: a)  there could be more than one AD name spaces, and b) easy to migrate security when changing AD, and c) have a clear picture for security assignment.


Use Cognos namespace to assign permissions to corresponding capabilities, such as report studio, metrics studio

Assign roles from Cognos namespace to .corresponding capabilities


Use Cognos namespace to assign permissions to individual object, such as folders, packages and reports


Monday, January 28, 2013

How to use the same security dimension table to allow users to access their own data and their manager’s data (row level security in framework manager)

Problem
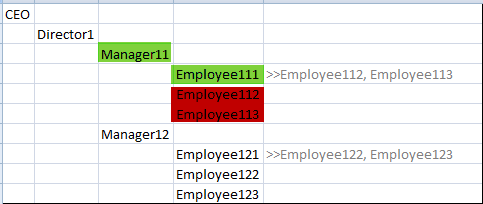
Please see sample below for an organization structure


The requirement is user Employee111 can only see his data and his manager (manager11) data, but not his co-worker data.

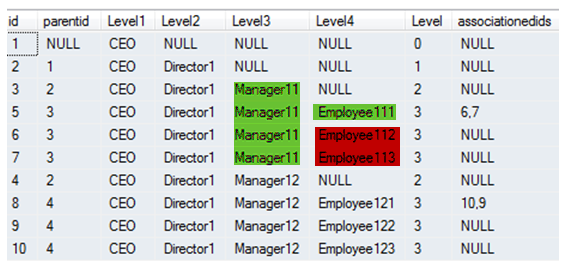
To provide a good data model in framework manager, this structure is flatted into the table below ( please see old post How to flatten hierarchy and associations for detail)


Analysis

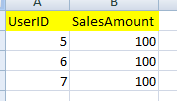
Given that there is a fact table as below


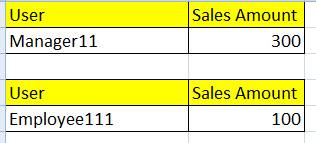
Employee 111 should see 100 sales.
Employee 111 should see 300 sales for his manager (department)

Case 1: It is easy to get Employee 111 see his own sales by applying data security with user ID level 4 based on active directory Employee111. It is translated into SQL statement like

[Security Dimension Table].[Level4] = ‘Employee111’

Employee 111 will get 100 sales


Case 2: Apply the similar data security, we can assign active directory Manager11 to Level3 . then It is translated into SQL statement like

[Security Dimension Table].[Level3] = ‘Manager11’

Employee 111 will get 300 sales for his manager


The issue here is how to assign this data security with two different cases.

Solution

The solution is to create two different security dimension query subjects with the same physical table, then assign security to these two different query subjects, and then create star scheme with these two query subjects

The detail implementation is listed below

Step1: Create two mode query subjects based on same security dimension table:

[Security Dimension Table level4]
[Security Dimension Table level3]


Step 2: Assign [Security Dimension Table level4]  for level4 users in active directory, while assign [Security Dimension Table level3]  for level3 user group in active directory


Step 3: Create scheme using two Security Dimension Tables with id join

Sales ------ [Security Dimension Table level4]  (Sales.id = [Security Dimension Table level4] .id)
Sales ------ [Security Dimension Table level3] (Sales.id = [Security Dimension Table level3] .id)


Step 4: Use [Security Dimension Table level4]  when generating report based on level4, and use [Security Dimension Table level3]  when generating report based on level3

The report should looks like follows


Note

Please note that data security only apply when dimension query subject with data security is used in report.  In other word, even you assign data security for a query subject, but the query subject is NOT used in report, the data security won’t apply at all. Please see old post for row level security for detail.

The idea above could become generic by applying the similar situation, such as association.