Check list of all posts
Objective
Using a single table to control all static and dynamic Row-Level Security (RLS) in Power BI has several advantages:
Centralized control: With a single table, you can centralize all your RLS rules and permissions in one place, which can make it easier to manage and maintain your data model. This can be particularly useful if you have a large number of users, groups, and data sets that need to be managed.
Improved efficiency: A single table can help to streamline the process of managing RLS permissions, as you only need to update a single table to make changes to the permissions. This can save time and reduce the risk of errors, particularly if you have a large number of rules or permissions to manage.
Simplified troubleshooting: With all your RLS rules and permissions in a single table, it can be easier to troubleshoot any issues or problems that may arise. You can use the table to quickly identify and fix any errors or inconsistencies in your RLS rules, which can help to ensure that your data model is accurate and up-to-date.
Overall, using a single table to control all static and dynamic RLS in Power BI can help to improve the efficiency, simplicity, and accuracy of your data model, and make it easier to manage and maintain your RLS rules and permissions.
We want to enhance our use of Power BI by consolidating all our Row-Level Security (RLS) requirements into a single role. Currently, we have to define static RLS and dynamic RLS separately, and we have to set up multiple roles for specific dimensions in static RLS. Additionally, we have different areas for each static RLS. To address this, we aim to combine all data into a single dataset and create a single role for all RLS to achieve the following goals:
1) Combine static and dynamic RLS, allowing users to access only their own data and the data they are allowed to see based on their role or group membership.
2) Create a static RLS for multiple dimensions, such as product and customer dimensions.
3) Create a single role for each dimension, such as multiple products.
This document will provide a solution that guides you through the process, from the database to the final reports.
Sample data setup (SQL server)
DROP TABLE IF EXISTS dbo.CYFact;
DROP TABLE IF EXISTS dbo.CYFact;
Go
CREATE TABLE dbo.CYFact(
UserID varchar(10) ,
Product varchar(10) ,
Customer varchar(10) ,
Sales varchar(10)
)
Go
insert into dbo.CYFact values
('U1','P1','C1',1),
('U1','P1','C2',2),
('U1','P2','C1',3),
('U1','P2','C2',4),
('U2','P1','C1',5),
('U2','P1','C2',6),
('U2','P2','C1',7),
('U2','P2','C2',8)
Go
DROP TABLE IF EXISTS dbo.CYRLS;
Go
CREATE TABLE dbo.CYRLS(
ID varchar(10) ,
Email varchar(100) ,
IsDynamicRLS varchar(10),
ProductStaticRLS varchar(10) ,
CustomerStaticRLS varchar(10)
)
Go
insert into dbo.CYRLS values
('U1','U1@Test.com','Yes','P1','C1'),
('U1','U1@Test.com','Yes','P2','C1'),
('U2','U2@Test.com','No','None','C1')
Go
DROP TABLE IF EXISTS dbo.CYUser;
Go
CREATE TABLE dbo.CYUser(
ID varchar(10),
Email varchar(100) ,
)
Go
insert into dbo.CYUser values
('U1','U1@Test.com'),
('U2','U2@Test.com')
Go
DROP TABLE IF EXISTS dbo.CYProduct;
Go
CREATE TABLE dbo.CYProduct(
ID varchar(10))
Go
insert into dbo.CYProduct values
('P1'),
('P2')
Go
DROP TABLE IF EXISTS dbo.CYCustomer;
Go
CREATE TABLE dbo.CYCustomer(
ID varchar(10))
Go
insert into dbo.CYCustomer values
('C1'),
('C2')
Data Model
Assuming that there are only one fact and three dimensions with a typical star schema. Please note the RLS is a disconnected table with all dimensions and fact tables.
 Security Logic
We use 3 sample records below to demonstrate all cases we try to achieve.
- U1 supports dynamic RLS, meaning that U1 can only access his data to the Fact sales table.
- U1 supports static RLS for the product dimension, with two products P1 and P2
- U1 supports static RLS for the customer dimension, with one customer C1 only
- U2 doesn't support dynamic RLS, meaning that U2 can access all data. For example, he can access U1 data.
- U2 doesn't support static RLS for the product dimension, meaning that U2 can access all products.
- U2 supports static RLS for the customer dimension, with one customer C1 only.
Role implementation
CYUser
VAR _DimRLS =
CALCULATETABLE (
VALUES ( 'CYRLS'[IsDynamicRLS] ),
'CYRLS'[Email] = USERPRINCIPALNAME ()
)
VAR _RLS =
SWITCH (
TRUE (),
_DimRLS = "No", TRUE (),
[Email] = USERPRINCIPALNAME (), TRUE (),
FALSE ()
)
RETURN
_RLS
CYProduct
VAR _DimRLS =
CONCATENATEX (
CALCULATETABLE (
VALUES ( 'CYRLS'[ProductStaticRLS] ),
'CYRLS'[Email] = USERPRINCIPALNAME ()
),
'CYRLS'[ProductStaticRLS]
)
VAR _RLS =
SWITCH (
TRUE (),
CONTAINSSTRING ( _DimRLS, "None" ), TRUE (),
CONTAINSSTRING ( _DimRLS, [ID] ), TRUE (),
FALSE ()
)
RETURN
_RLS
CYCustomer
VAR _DimRLS =
CONCATENATEX (
CALCULATETABLE (
VALUES ( 'CYRLS'[CustomerStaticRLS] ),
'CYRLS'[Email] = USERPRINCIPALNAME ()
),
'CYRLS'[CustomerStaticRLS]
)
VAR _RLS =
SWITCH (
TRUE (),
CONTAINSSTRING ( _DimRLS, "None" ), TRUE (),
CONTAINSSTRING ( _DimRLS, [ID] ), TRUE (),
FALSE ()
)
RETURN
_RLS
Test result
No Security ( Admin )
U1: User 1 login
U2: User 2 login
Note 1: If a user is assigned to two roles for row-level security (RLS) in Power BI, they will have access to the data that is allowed by the rules associated with both of those roles. This means that the user will be able to see all of the data that is allowed by the rules for either of the two roles. However, we try to assign everyone to a single role, driven by the table defined.
Note 2: If a user has no role assigned with row-level security (RLS) in Power BI, they will not be able to access the data in the dataset. This is because RLS is designed to restrict access to data based on the user's role, and a user who has no role will not have any access to the data.
Note 3: To give people full access to data in Power BI using row-level security (RLS), you can create a role with no rules, or you can create a rule that allows access to all rows of data.
To create a role with no rules, you can simply define the role in the Power BI service and assign users to it. This will allow those users to see all of the data in the dataset, regardless of any other roles they may be assigned to.
Another way to do it is to assign this user to the contributor for the workspace where the dataset resides.
Note 4 The key to understanding RLS is that we implement RLS on the Power dataset. So, first of all, we need to figure out the fundamental permissions to Power BI datasets, which is the write permission. If a user has written permission on a Power BI dataset, then RLS won’t apply for this user. Why? Because the user can edit permission for these roles. If the user doesn’t have permission to write the dataset, RLS is fully enforced, no matter where the user has access to this dataset, in the original workspace, or any apps and shared links.
Who has write permission for a dataset?
The user has access to the same workspace of the Power BI dataset and has permission as
• Admin
• Member
• Contributor
Who has no write permission on the dataset?
There are three cases where people have no write permission:
1) Report is in the same workspace as dataset. The user has permission as Viewer only.
2) Report is in a different workspace than the dataset. Users can be assigned to any security group, however these users should have only read, or build permission to the dataset.
3) Reports are accessed by a shared links
4) Reports are accessed by an apps
The diagram below illustrates all cases below.
Note 5: The "apply security filters to both directions" option in Power BI Row-Level Security (RLS) is used to enforce security filters in both the filters and visuals panes of a report. This can be useful for ensuring that users only see data that they are authorized to see, regardless of how they interact with the report.
For example, consider a report that contains a visual showing sales data for different products and customers. You have set up RLS rules to limit access to certain products based on the user's role, but you want to ensure that users cannot see data for customers that they are not authorized to see, even if they try to manipulate the filters or visuals to see data for other customers. In this case, you could use the "apply security filters to both directions" option to enforce the security filters in both the filters and visuals panes of the report. However, this solution might not be the best, as there are two problems: 1) when the transaction table is huge, then it will result in poor performance; 2) You might want customers, even if you don't have sales with the context of filters.
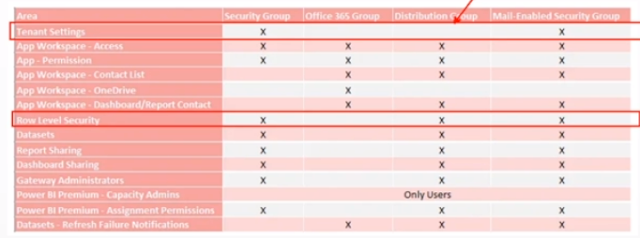
Note 6: User group to setup permissions:
Note 7: Why LOOKUPVALUE method is much more flexible than USEPRINCIPALNAME:
Dynamic security is a feature that allows you to change the level of access that users have to data in a Power BI report or dashboard at runtime. It allows you to specify which data a user can see based on their identity or role within an organization.
One way to implement dynamic security in Power BI is by using the LOOKUPVALUE function in combination with a security table. The security table is a table in your Power BI dataset that defines the level of access that different users or groups have to different data.
The LOOKUPVALUE function allows you to look up a value in a table based on a matching condition. In the context of dynamic security, you can use the LOOKUPVALUE function to look up the level of access that a user has to a particular data element in the security table, based on their user name or group membership.
For example, suppose you have a Power BI report that displays sales data for different products and customers. You can use the LOOKUPVALUE function to check the security table to see if the current user has access to the data for a particular product or customer. If the user has access, the LOOKUPVALUE function will return the value "Allow" and the user will be able to see the data. If the user does not have access, the LOOKUPVALUE function will return the value "Deny" and the user will not be able to see the data.
Using the LOOKUPVALUE function and a security table allows you to implement dynamic security in a flexible and scalable way. It allows you to control access to data at a granular level and to change the level of access that users have to data on the fly, without the need to update the report or dashboard.
By contrast, the USEPRINCIPALNAME function allows you to filter data based on the current user's login name. While this can be useful in some cases, it is less flexible than using a security table and the LOOKUPVALUE function, as it does not allow you to specify different levels of access or to easily change the level of access that users have to data.


No comments:
Post a Comment